Aug 21

JavaScript! The Doctor Is In.

Bespin, JavaScript, Mozila, Open Source, Tech No Comments »

thedoctors

Dimitris Vardoulakis has created a Doctor. A Doctor for JavaScript that does static analysis on your code to tease out the type information and more.

This is fantastic work, and is something that we were dreaming of when we first planned Bespin. What if the cloud was constantly analyzing your code and returning type metadata back to the clients that were accessing it? That metadata can be used for tasks such as code completion and documentation.

Give it a try to see what comes out the other end. The samples show you a lot, such as polymorphism:

function id(x) { return x;}
id(42);
id('hello, doctor!');
 
// returns
id : function(<number | string>)<number | string>

and prototypes:

function Rectangle(w, h) {
    this.w = w;
    this.h = h;
}
Rectangle.prototype.area = function() {
    return this.w * this.h;
};
var a = (new Rectangle(2, 3)).area();
 
// returns
Rectangle : function(number, number) → any
area : function() → number

and exceptions:

function findLargest(a) {
    if (a.length === 0) throw new Error('empty array');
    var max = a[0];
    for (var i = 1, l = a.length; i < l; i++)
        if (a[i] > max)
            max = a[i];
    return max;
}
function foo() {
    var a = [1,2,3];
    try {
        return findLargest(a);
    } catch (e) {
        return e.message;
    }
}
foo();
 
// returns
findLargest : function(Array[number]) → number
foo : function()<number | string>

and callbacks:

function call(f, x) { return f(x); }
function add1(n) { return n + 1; }
function truncate(s) { return s.substring(0, s.length - 1); }
var n = call(add1, 41);
var s = call(truncate, 'abcd');
 
// returns
call : function(<function(number) → number | function(string) → string>, <number | string>)<number | string>
add1 : function(number) → number
truncate : function(string) → string

Mike Shaver talked about the great work that is coming in JS land right now for Moz…. and it is showing. Can’t wait to see both Firefox and Bespin gain from this all!

Oct 22

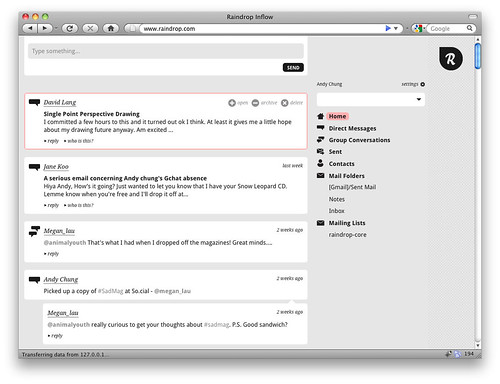
Raindrop announced; Hacking your email again; Getting personal

Bespin, Mozila, Tech with tags: 2 Comments »

I am really jazzed to see the work of the Mozilla Messaging team (Andy Chung, Bryan Clark, Dan Mosedale, David Ascher, Mark Hammond, and James Burke) out there.

Raindrop was so exciting to me, as it allows me to take ownership of how I handle communications.

Gmail is fantastic in that I have been able to extend my experience via Greasemonkey and the Labs tweaks, but it isn’t really open to me.

With Raindrop, you not only get to scrape out some flexibility in the client, but you get to do it the entire stack down. You can write code that changes BOTH frontend and backend. Have you ever wanted to do more than simple filters? Write handlers for particular content in an email? Help you mashup your email in any way? Raindrop will give you that.

It is early days of course. Mozilla is known for getting something out there early so the community can influence it, so jump in.

I am also excited to see that you can hack on things right int he client via an embedded Bespin. Awesome, I can’t wait to see what happens next guys!

There are a slew of interesting videos to check out too:

Sep 11

Chuck Finley can see you deploying your code; Bespin 0.4.3

Bespin 2 Comments »

Kevin has done a great job in his round up of the 0.4.3 Chuck Finley release of Bespin.

It may be a point release, but there is a lot of great stuff here.

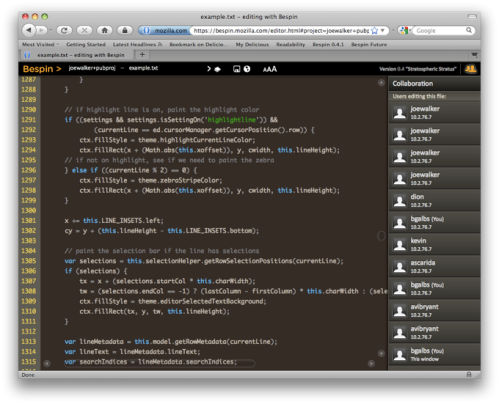
Joe keeps improving on the solid collaboration work, and in this release we see nice needed features, like the ability to track where other collaborators are via cursor:

That feature will get prettier, and hopefully soon we will have the ability to show exactly who typed what.

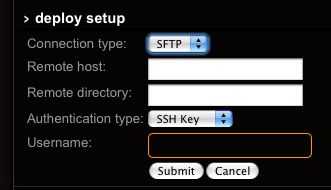
Kevin has added a “deploy” command that allows you to take your project and sync it up to your webhost:

It is built on the cool omnisync open source project.

Go open source!

We have some awesome plans for 0.5 and beyond too. The team is really cranking.

Aug 21

Mashing up some GUI with your ancient command line

Bespin, Tech with tags: 6 Comments »

Mitcho has put together a killer tool, The Ubiquity Persistence Project, that lets you tweak the look and feel of Ubiquity on the fly in order to prototype it:

This reminded me of a topic that I have been mulling around in my head. With Bespin we spend time thinking about how text editors have innovated in little ways (and important ones: code completion etc) over recent years. We want to speed that up, hence the social features.

One part of Bespin is the command line which is a core part of the experience and continues to grow in its role. The goal has always been to merge the Bespin command line with Ubiquity in some way, and people have played with that idea since we modeled our commands to be similar to Ubiquity’s.

Since our command line is in HTML and not on a terminal, we had different ways of helping the user do what they want to do. Take the UNIX command line for example, what has changed there?

  • A shell created the notion of “completion”: first for files/dirs, and then to now where you can do super smart completion
  • At some point we got colors (LS_COLORS and the like). Woohoo!
  • Keyboard shortcuts get us to move around our history nicely

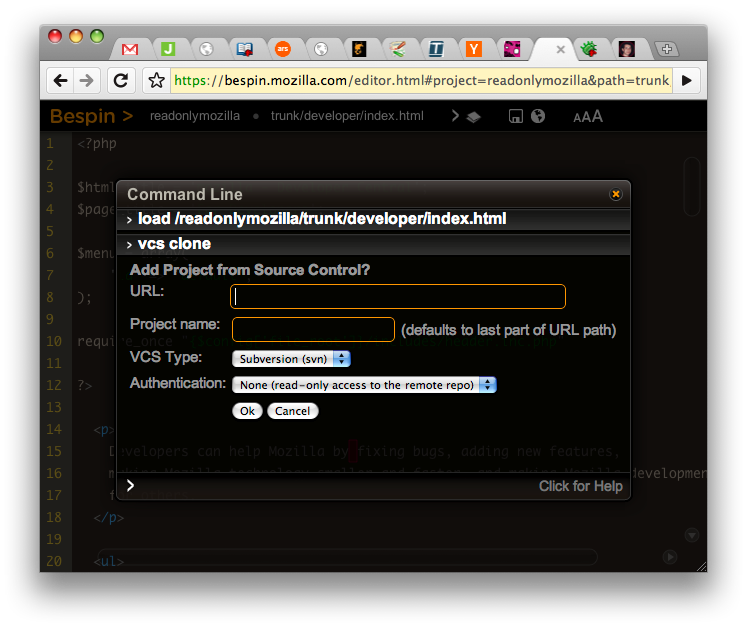
Useful things, but nothing compared to what you can do if you have more than text. We ended up following a pattern where, if you don’t put in the right command line parameters, you get prompted. This isn’t the same as having the command program itself ask you, as you can declare it in the command and the prompt can be as rich as you want. For example, here is the vcs clone command. In theory we could make the command take a bunch of options: vcs clone --url https://svn.mozilla.org/... --project myproj --username user --password pass ... or we could ask for it (and allow browser history to kick in and help):

bespincommandlineprompt

This is a touch crude, but shows you where we are going. I want to be able to declare the types and names of values that a command needs, and have a UI help the user out. As you are typing the command a popup can appear showing you the items that you have to complete, and those that are optional, and help you fill them in with values that make sense.

In fact, although it will be great to make the Bespin command line awesome, it makes me whimper when I am back to good ole Terminal.app. Can’t we mash that up too?

terminal

Time for Commandline 2.0! It would be awesome to have an incredibly rich version of Terminal.app that helps you in amazing ways. As the Web becomes the platform, that may just happen via Ubiquity itself :)

Aug 13

Social coding step one; Collaboration support in Bespin launched

Bespin, Tech with tags: 3 Comments »

Bob in Boston: “Hey Harris, can you help me on a bit of code?”
Harry in Hamstead: “Sure Bob, can you send me the file?”
Bob: “I have an account on Bespin so I checked the project out over there and shared it with you”
Harry: “Ah, OK. I will ‘follow’ you and look at the project. What file?”
Bob: “bob+FooProject/bar.js.”

… go on to collaborate on the file and check it back into VCS …

I am really excited that with the beta release of collaboration in Bespin we have enabled that use case.

We really want to enable people to code in a more social environment. As someone who has worked with remote teams for many years, the value of code review and pair programming has been very apparent. On day one we put very simple collaboration in Bespin that enabled a couple of things:

  • Autosave: Your data was always saved back to the cloud, including your undo/redo queue. This enabled you to go home, open up your browser, and be right where you were from the work machine
  • Shared hacking: developing on the same code at the same time (a la SubEthaEdit etc)

Making this puppy scale is tough, and Joe Walker has working on this for awhile using Neil Fraser’s mobwrite system. What is interesting about mobwrite is the diff/patch mechanism that allows you to do fuzzy matching. This means that losing some packets here and there doesn’t matter as much and you catch up quicker. We still have a lot of work to do there, including the ability to create the diff’s manually (e.g. since we know your actions we can build the diff directly instead of doing a diff on a file) which will speed things up for large files.

What do we have right now? Check out the release:

Using Collaboration

As part of collaboration we need to notion of connections between people and access control. A few new commands give you access to this information:

  • follow/unfollow: allow you to decide whose shared projects you want to see in your project navigator. As we evolve Bespin this will become a way to get all sorts of information about the people you are working with
  • group: allows you to put the people you are interested in into groups to make it easy to manage sharing
  • share: allows you to export your projects read-only or editable to individuals, groups, or to everyone

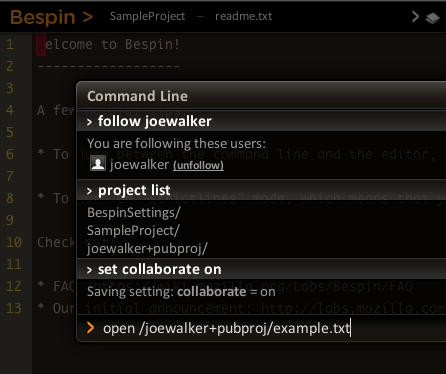
To get started quickly, you can jump in to a public shared project that Joe has setup. Once logged in to Bespin follow the steps:

  • Press CTRL+J/CMD+J to open the command line.
  • Type follow joewalker to get someone to share files with. I’ve shared a project called pubproj globally.
  • Type project list. You should see joewalker+pubproj in your list of projects.
  • Type set collaborate on to turn on shared editing.
  • Open a shared file by typing open /joewalker+pubproj/example.txt.

Your command line should look something like this:

We have a collaboration sidebar that you can access from the top right icon (which turns blue if you have collaboration on, and yellow if you are actively collaborating on a file with someone).

If you want to see this in more detail, watch the screencast:

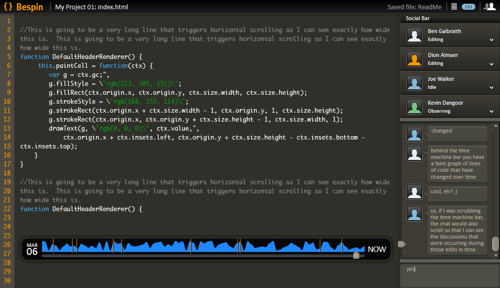
This is a beta release, and is just the beginning of the social roadmap. Once we have this core we can then strap on a bunch of helpful UI (painful that we don’t show where other collaborators are, and what each person has been doing) as well as killer features that excite us such as a full social bar with chat that ties to files and a “time machine” ability:

There is more in the 0.4 release too. One interesting experiment has been adding UI to the command line. You will notice that if you type vcs clone the command line will add an inline form for you to give it more information. This is a crude beginning, but an exciting one.

Jul 27

Cleanup of manual animation via Dojo Animation

Bespin, JavaScript, Tech with tags: , 4 Comments »

When posting on the Bespin Pie back in the day, I showed the Dojo animation code that we used to fake out our canvas pie animation:

var anim = dojo.fadeIn({
    node: { // fake it out for Dojo to think it is changing the style :)
        style: {}
    },
 
    duration: 500,
    easing: dojo.fx.easing.backOut,
 
    onAnimate: function(values) {
        var progress = values.opacity;
        renderPie(progress);
    }
}).play();

Pete Higgin’s hinted that we should cleanup this hack (asking to do the opacity and then getting the value back out) and finally (due to a weird bug in a WebKit nightly that gave me reason to poke) I cleaned it up:

new dojo._Animation({
    duration: 500,
    easing: dojo.fx.easing.backOut,
    curve: [0.0, 1.0],
    onAnimate: renderPie
}).play();

I am sure there is an easier way too!

FYI, the “pie” is finally a pie menu in tip, which will make its way to a Bespin version push soon with functionality we have been dying to get in production since the initial prototype.

Jul 08

Code Dimensions; How can we write code in more than 2D?

Bespin, Tech 7 Comments »

codedimensions

As I think about a lot of the features that excite me the most about Bespin, they tend to break up into features that connect people, and those that add more dimensions to the software development process.

Doing more with Time

When I look at the evolution of editors, we have been mostly stuck looking a files, with the odd perspective on top of that (e.g. show me class diagrams). We have used tools like VCS to be able to go to different points in time, but I haven’t seen a popular editor that does much more than that.

bespineditor_02_socialbar_090528b

One feature that I am excited about in Bespin, is the ability to have a “time machine” construct. I want to be able to flip around in time and see the code change before my eyes. On the timeline, I should be able data points such as: when commits happened, issues that track to the code, code size, who worked on it, etc.

I would also use this feature a lot casually. For example, to view a new commit that came in, I could simulate walking through what the developer did with that patch and grok it inline instead of staring at a huge diff. When you add the dimension of time to the tool in a deep way, I think developers will be able to add a lot of interesting features to help them visualize and produce great code.

Find Usages++

I wish I had better pivot tables for my code. We often make choices on how we compose our code modules, and there are always tradeoffs. Do you put your cross cutting concerns into the objects so when you look at one object you see it all? Or do you put the same things in a separate area so you can see “all the times I do X”. We run into this issue in spades with meta programming, where it can be hard to see everything that is going on.

Rather than having to make a choice, I want to pivot my code on the fly. I want to be able to ask my code:

  • Show me all of the data access logic that is used in this app
  • What are all of the URL mappings
  • Where is all of the keyboard handling
  • What are all of the public events that I could hook into?
  • What are all of the consumers of the event “foo”

I am interested to see if there is a way to easily get at my code in new ways, and also be able to make changes and have those changes go back to the right place. This is tricky…. but intrigues me.

Heuristics

Why am I not being told more about my code? It feels like I have to poll my tools all the time, and they don’t tell me much. Granted, I get help with syntax checking, incremental compilation, completion… great stuff. But, I want more.

I want to be told when I am duplicating a bit of code. I want to be told the instant I cause a regression in some tests. I want to be told the minute something I do messes up in a runtime (e.g. a browser). I want to be told the minute another developer on the team stepped on the same code (commit so she has to merge!).

There are a ton of heuristics that we can do on the client and up in the cloud (aside: fun little jap on cloud “#chromeos reinforces my belief that cloud computing is just mainframes with rounded corners.”)

This isn’t just about code, but also about the project lifecycle too. I need to write a separate post on that, and what is doing in that area.

Visualizations

I just happened across Code Canvas, a prototype zoomable UI for looking at a code project.

It is exciting to get time to think in the developer tools space. There is just SO MUCH that can be done to make development more fun and productive. By adding in low level hooks to multiple dimensions, I hope that we can do a lot more. What would you like to see?

Jun 04

Pi and Pie: Enjoying some time with trigonometry

Bespin, Tech with tags: , , 7 Comments »

With a wife with a masters in education, you tend to think and chat about education from time to time. I enjoy thinking about how social software could help education in the future. One of the fields that I enjoy thinking about is Maths. It was my favorite subject as a kid and I had the benefit of a great teacher. In general though, it feels like Math is often taught in such a painful way.

I remember being sent an article that discussed how Math is taught by comparing it to music. It postulates a world in which music is taught without instruments. You have to learn music theory for 10 years before you get to pick up that flute. What kid would get excited about a world of that music? That is what we do to them with Math.

Time for Pie

I mentioned the Bespin pie menu before. In our first version you jump to the different pieces with the keyboard. Of course, one of the benefits of a pie menu is that Fittss’s Law kicks in and you can easily jump to an item. (Aside: the dirty secret of our pie menu is that it isn’t really a pie menu, it currently sits at the bottom and not where you right click etc.)

As we start to put in mouse support, the first thing we need to do is be able to determine which slice of the pie is being clicked on so we can activate it. This gave me the opportunity to go down trigonometry lane.

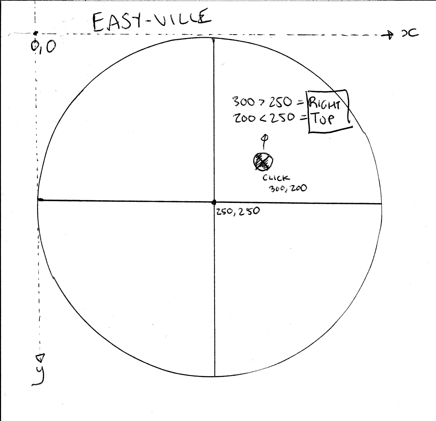
easyville

If the pie was sliced with vertical and horizontal lines like the image above, then it would be very simple indeed. To start with, what information do you get when the user clicks? We get an x and y coordinate with an origin starting point in the top left. There are various x and y coordinates that you will get from the MouseEvent (x, y, offsetX/Y, pageX/Y, rangeX/Y, clientX/Y, layerX/Y). We care about the offsetX/Y or layerX/Y value (depending on the browser), which will give us the point with the origin starting at the top left of the canvas itself and not the window.

With the example above you could simply take the computed x and y coordinates and simply check them to determine the segment. For example, if x is less than the radius then it is a segment on the left. If y is less than the radius then it is a segment on top.

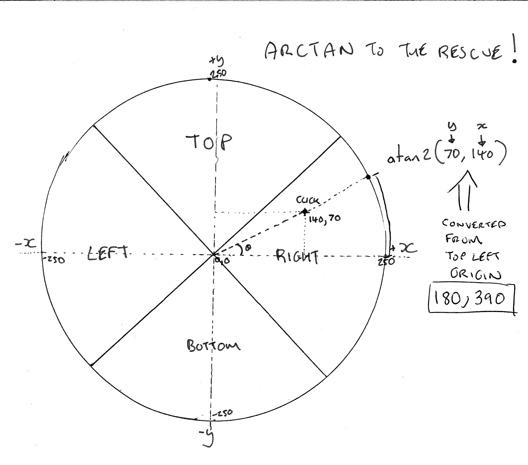
But we don’t have that luxury. Instead we have to do some simple Math. I drew out the problem with various bits of information here:

arctan

You will see the slices match the pie menu, and I drew in an X and Y axis that cuts through the center of the pie. In the diagram you will see an “x” marking the click in the right slice. How do we work it out? Well, what do we know? First we can calculate the location of the point based on the center of the circle. Remember that the browser will tell you the x and y based on the top left and not the center, so we quickly repurpose the coordinate based on the top left of 390, 180 and convert it to 140, 70. This is simply done via:

function centerPoint(x, y) {
    return { x: x - RADIUS, y: (y - RADIUS) * -1 };
}

Now we have the relative point from the center of the circle we can calculate the angle that will then in turn let us know which quadrant we are in.

Arctan and atan2()

The easiest way to calculate which quadrant we are in is to simply calculate the angle of the dangle. To do that we calculate the arc tangent between two lines in a triangle, the y=0 line across the x axis, and a line between y=0 and the point in question.

It turns out that we get this calculation for free, via Math.atan2:

function angle(x, y) {
    return Math.atan2(y, x) * 180 / Math.PI;
}

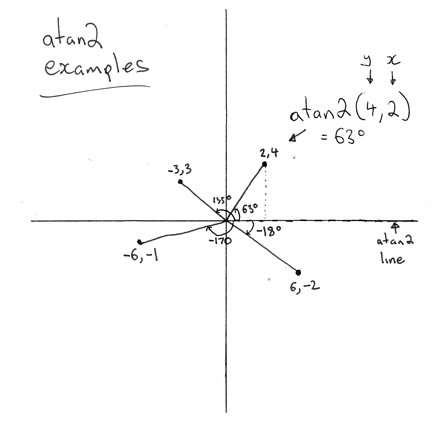
To explain how this works, see the scribble below that shows 4 different points and the resulting angles based on angle(). One gotcha that you will notice is that atan2() takes the coordinates in the order: y, x but elsewhere you are used to using the opposite x and then y. Be careful!

atan2

Once we have the angle based on the x axis, we can have a simple case statement to check the bounds.

If the angle is below -45 and 45 degrees, it is on the right. Greater than 45 and less than 135? Then we have the top. And so on.

With a little fun Math, we get to have Pi solve our Pie problem. To see the code at work, check out the test bed.

May 15

Bespin gives you some Pie and will do more Web Work for you

Bespin, Tech, UI / UX with tags: , , 2 Comments »

There have been a couple of things that have been really fun to see and work on in Bespin recently.

First up, is our new Pie Menu that Ben just posted on. The short reasons why I like the new look are:

  • Giving as much area to your code as possible. Why show a command line all the time when you only need it when you run commands? Why have headers and subheaders?
  • Pushing the boundaries on subtle animated effects that full screen change the bits “on the glass”

The implementation is interesting too. We took the nice animation and easing functions that Dojo already provides, but instead of it powering the DOM, we hook in and have it power our Canvas animations instead.

For example, to show an incoming animation we use a fadeIn effect with the backOut easing. In onAnimate we use the opacity setting that the animation provides to render our own animation:

var anim = dojo.fadeIn({
    node: { // fake it out for Dojo to think it is changing the style :)
        style: {}
    },
 
    duration: 500,
    easing: dojo.fx.easing.backOut,
 
    onAnimate: function(values) {
        var progress = values.opacity;
        renderPie(progress);
    }
}).play();

Here you can see it in action in video form:

Or, go to the live sample.

We are excited to pump up the “fun” in the UI (with options to tone it down of course). Once nice side effect is that the editor component will have this all baked in, so where ever you see a Bespin, you will be able to access the features you want.

Web Workers; Not having them do too much

Malte Ubl continues to do much appreciated interesting work for the Bespin project. His facade around Web Workers is good stuff.

Since we are trying to push the boundaries of the Web hard, and giving some sexy to the UI, we need to make sure that we keep responsiveness as the highest priority, else users will go nuts.

Web Workers give us the ability to do a lot more in Bespin, but outside of the main browser “thread”. For example, doing real-time analysis on the code itself (e.g. setsyntaxcheck all). The problem that we ran into as we started to use Workers for this type of thing, was making sure that we weren’t killing the poor CPU. It is all well and good to fire off work to a Worker, but how many are running crunching? Malte has done work to make sure that the CPU fan doesn’t go nuts if you are doing a lot of work, and this is something that people will have to generally work around as they start to do more and more in their Web applications. It may be nice in the future to have a richer API that you could use to time slice your background tasks in a better way, as there is a lot of work that fits into the “kick this out and run at your convenience” mould.

Malte recently posted on how added support for the Bespin event loop into the Workers themselves. This is really nice as a Bespin developer as you can use the same publish/subscribe event metaphor, and the Worker facade handles it all for you, so you can talk across the boundaries. This hugely changes the amount of code that you have to write.

He also added support to help the asynchronous issues around “Can you fire this, but make sure that it only fires after foo, bar, and baz are all fired”. We will probably need to cache certain published events so we don’t get into a situation where you run this code after a main initialization event has fired, and thus you will never see it again.

Building a Web application using the latest and greatest HTML5 features is a lot of fun, and we hope that developers will like it too.

Apr 06

Creating custom scrollbars with CSS; How CSS isn’t great for every task

Ajax, Bespin, JavaScript, Web Browsing with tags: , , 22 Comments »

Have you tried to create a nice rich experience and then been fighting the “defaults” to go the extra mile? This reared its head with me recently with Bespin. There are certain commands that pull up divs of content and we need to scroll through it. The problem is that the native scroll bar looks so out of place:
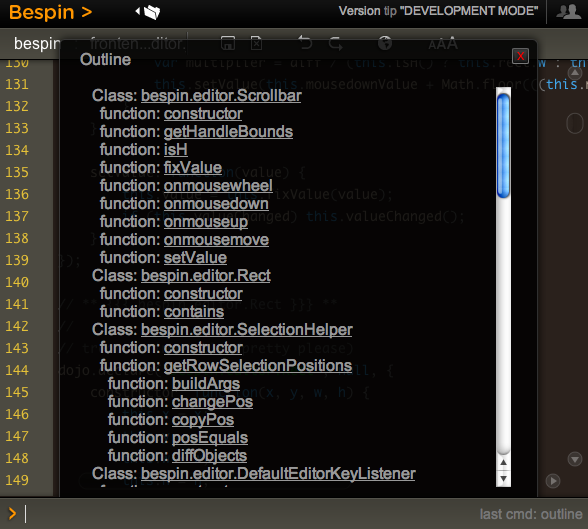
uglyscrollbar

WebKit recently released the ability to style scrollbars in HTML elements (but not the main window, which you have been able to do in IE for donkeys years much to many peoples chagrin).

I decided to take it for a spin and loaded up the examples that show you being able to do every type of scrollbar that you can imagine:
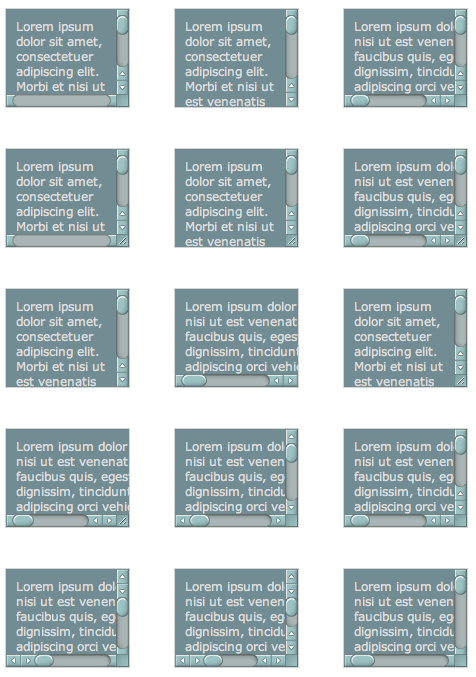
manyscrollbars

So, it shouldn’t be so hard should it. From the blog post I see a few magically ::-webkit-scrollbar CSS properties that I can plugin and be on my way. But looking at the example view source you see many pieces like this:

:not(.none):not(.double-start)::-webkit-scrollbar-track-piece:vertical:end:single-button,
:not(.none):not(.double-start)::-webkit-scrollbar-track-piece:vertical:end:double-button,
.single::-webkit-scrollbar-track-piece:vertical:end,
.double-end::-webkit-scrollbar-track-piece:vertical:end,
.double-both::-webkit-scrollbar-track-piece:vertical:end {
    margin-bottom: -6px;
}

Holy pseudo classes batman! To be fair, this is partly due to the example page having many types of scrollbars in one (hence the not this and not that but the other) but there are still nested classes that you need to grok to get this going.

I quickly built a debug scrollbar where I styled the various pieces with simple colors and borders so I can see which was which. I also went about making the scrollbar have one up arrow on top, and one down arrow on the bottom.
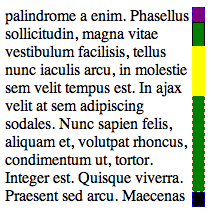
debugscrollbar

The parts and pieces of a scrollbar are quite simple:

  • Thumb: This is the piece that shows you where you are in the scrollbar. This is the chap that you can move around
  • Track: This is the area of the scrollbar that you can move the thumb up and down, or along (depending on the orientation). There is both the area between the top and the thumb, and between the bottom of the thumb and the bottom of the scrollbar
  • Buttons: There may be buttons that you can click to increment or decrement the selection (which moves the thumb). There are various styles (single button, double button, etc)
  • Resizer: This can change the are of the element (e.g. enlarge of shrink)
  • Corner: This area may show up with both horizontal and vertical scrollbars open

The debug scrollbar kinda shows these areas off in a simple visual way. Note how using display: block|none enabled me to setup the single button on top and bottom functionality:

/* Turn on a 13x13 scrollbar */
::-webkit-scrollbar {
    width: 13px;
    height: 13px;
}
 
::-webkit-scrollbar-button:vertical {
    background-color: red;
    border: 1px dashed blue;
}
 
/* Turn on single button up on top, and down on bottom */
::-webkit-scrollbar-button:start:decrement,
::-webkit-scrollbar-button:end:increment {
    display: block;
}
 
/* Turn off the down area up on top, and up area on bottom */
::-webkit-scrollbar-button:vertical:start:increment,
::-webkit-scrollbar-button:vertical:end:decrement {
    display: none;
}
 
/* Place The scroll down button at the bottom */
::-webkit-scrollbar-button:vertical:increment {
    background-color: black;
    border: 1px dashed blue;
}
 
/* Place The scroll up button at the up */
::-webkit-scrollbar-button:vertical:decrement {
    background-color: purple;
    border: 1px dashed blue;
}
 
::-webkit-scrollbar-track:vertical {
    background-color: blue;
    border: 1px dashed pink;
}
 
/* Top area above thumb and below up button */
::-webkit-scrollbar-track-piece:vertical:start {
    border: 1px solid #000;
}
 
/* Bottom area below thumb and down button */
::-webkit-scrollbar-track-piece:vertical:end {
    border: 1px dashed pink;
}
 
/* Track below and above */
::-webkit-scrollbar-track-piece {
    background-color: green;
}
 
/* The thumb itself */
::-webkit-scrollbar-thumb:vertical {
    height: 50px;
    background-color: yellow;
}
 
/* Corner */
::-webkit-scrollbar-corner:vertical {
    background-color: black;
}
 
/* Resizer */
::-webkit-scrollbar-resizer:vertical {
    background-color: gray;
}

By moving the scrollbar around I could quickly see how this all worked, and it got me to this point which enabled me to plugin the images to make this puppy work for Bespin:
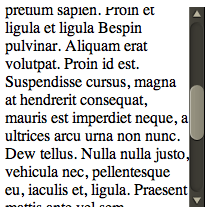
bespinscrollbar

There were a couple of key tweaks needed to make this work:

Getting the buttons working

I used the same trick used in the debug example to turn on the up area above, and the down area below, and then it was just a matter of targeting the correct area for the arrow images:

/* Turn on single button up on top, and down on bottom */
::-webkit-scrollbar-button:start:decrement,
::-webkit-scrollbar-button:end:increment {
    display: block;
}
 
/* Turn off the down area up on top, and up area on bottom */
::-webkit-scrollbar-button:start:increment,
::-webkit-scrollbar-button:end:decrement {
    display: none;
}
 
/* Place The scroll down button at the bottom */
::-webkit-scrollbar-button:end:increment {
    background-image: url(images/scroll_cntrl_dwn.png);
}
 
/* Place The scroll up button at the up */
::-webkit-scrollbar-button:start:decrement {
    background-image: url(images/scroll_cntrl_up.png);
}

Get the track pieces to show

Next up was getting the gutter to show up. As mentioned early on, there is one track, but two areas that can show…. before the thumb and after. You can target these areas via -webkit-scrollbar-track-piece:start || :end and then it is a matter of using the multiple background ability available in new browsers. First we have the top of the gutter, and then a recurring background (and the same for the bottom). This way it just grows with the area that it gets:

/* Top area above thumb and below up button */
::-webkit-scrollbar-track-piece:vertical:start {
    background-image: url(images/scroll_gutter_top.png), url(images/scroll_gutter_mid.png);
    background-repeat: no-repeat, repeat-y;
}
 
/* Bottom area below thumb and down button */
::-webkit-scrollbar-track-piece:vertical:end {
    background-image: url(images/scroll_gutter_btm.png), url(images/scroll_gutter_mid.png);
    background-repeat: no-repeat, repeat-y;
    background-position: bottom left, 0 0;
}

The Thumb

To get the thumb working, I thought I would do the same background image trick with three images (top of thumb, bottom of thumb, and background for the middle). Unfortunately this didn’t seem to work for me as I couldn’t get the middle to not go through the top and bottom. So, instead, I went with another new CSS trick: border-image. Here I splice the top and bottom of a thumb (the top and bottom 8 pixels) and stretch the rest:

/* The thumb itself */
::-webkit-scrollbar-thumb:vertical {
    height: 56px;
    -webkit-border-image: url(images/scroll_thumb.png) 8 0 8 0 stretch stretch;
    border-width: 8 0 8 0;
}

John Resig has a nice readable post on border-image.

And, there you have it. Now we can have nice Bespin-y scrollbars throughout Bespin. This may not be complete though, as we have the ability to also tie in :active and :hover work if we wish (change the color when selecting etc).

Of course, many people had “custom scrollbars”. There are plenty of comments on the original Surfin’ Safari post, and various rants about Flash versions. I agree that we have all seen bizarre Flash versions of scrollbars that don’t look like them at all, and where the designer didn’t bother to put in support for the mousescroll ability etc, but this is a bit different. It let’s you merge in your look and feel, yet with native scrollbar functionality.

And, with Google recreating the button maybe we can feel a little bit better about tweaking the look of common UI elements as long as they are familiar enough to users to still make natural sense.

Now, the CSS declarative way to do scrollbars seems to get pretty ugly to me with all of he pseudo classes and various magic to get the functionality that you would like. I have to admit to liking Kevin’s demo of Flash Catalyst at Web 2.0 Expo and how it lets designers build out a scrollbar. We should be inspired to do tools like this. What if we had an API that wasn’t CSS, but let us say: “I want a Mac style double on the bottom button scrollbar. And, here is a thumb, here is a track, go for it”.

That being said, at least we do have the ability to do this kind of thing now. I hope that other browsers follow WebKit in this instance.